| Figure A |
| |
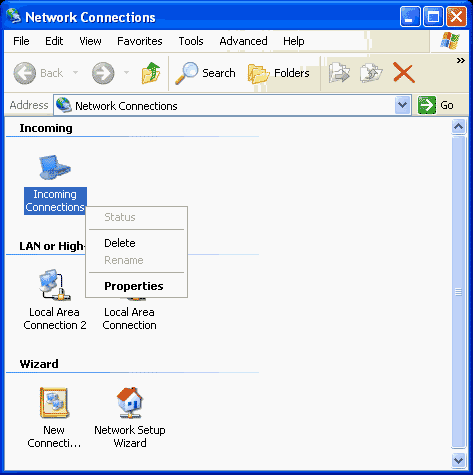
| The Network Connections window |
For the Small Office/Home Office (SOHO), Windows XP Professional VPN features
are a real boon. Traveling users with laptops or handheld computers will inevitably
want files on the home network; you just can’t bring everything with you. This
is where the beauty of the Windows XP Professional computer connected to an
always-on connection, such as DSL or cable modem, shines. That always-on link
can be used to accept incoming VPN connections and allow your mobile users to
access shared folders and files on your private network.
In this article, I’ll explain how to configure a Windows XP Professional computer
to accept incoming VPN connections and discuss some tips on improving the remote
access experience for the VPN client computer user.
Windows XP’s all-in-one VPN solution
Windows XP Professional is designed as the one-stop solution for the SOHO, taking
all the usability features available to Windows Me users and adding the powerful
networking features available in Windows 2000. The combination lets you create
the ideal remote access solution for the SOHO.
The Windows XP Professional remote access server capabilities are very similar
to those available in Windows 2000 Professional. A Windows XP computer can accept
a single incoming connection on each interface that can accept a connection.
For example, a Windows XP machine can accept incoming connections on each of
the following interfaces:
While it’s unlikely, a Windows XP Professional machine with the above configuration
could conceivably accept up to four simultaneous RAS connections. However, the
typical configuration consists of a single RAS client connection, either through
a dial-up modem interface or a VPN interface.
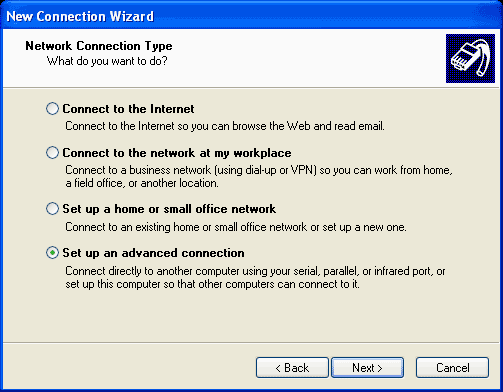
Create an incoming connection with the New Connection Wizard
Like Windows 2000 Professional, Windows XP Professional includes a New Connection
Wizard. I’ll show you how to use the New Connection Wizard to create the new
VPN server interface. In this example, I’ll assume the Windows XP Professional
machine is not a member of a Windows NT 4.0 or Windows 2000 domain. The machine
has two network interface cards; one is directly connected to the Internet,
and the other is connected to the internal LAN. In addition, the external interface
of the machine is configured for Internet Connection Sharing (ICS). While ICS
changes the IP address of the LAN interface of the ICS computer to 192.168.0.1
through 16, it's easy to change the IP address to one that fits the existing
network environment. The IP address of the LAN interface of the ICS computer
was changed to 10.0.0.1 through 24 to fix the preexisting network configuration.
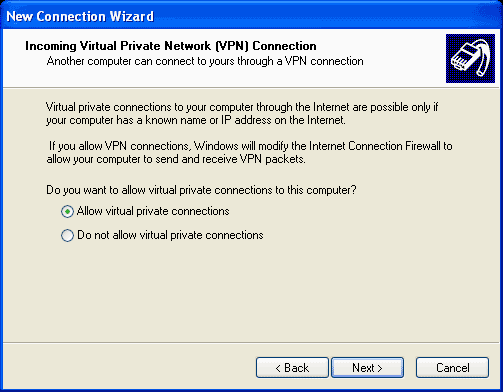
Running ICS and incoming VPN connections on the same interface
I have been able to run ICS and incoming VPN connections on the same interface.
However, to prevent problematic configuration issues, you should configure the
VPN interface before you configure ICS on the same computer.
How to create the VPN server interface, step-by-step
| Figure A |
| |
| The Network Connections window |
| Figure B |
| |
| Figure C |
| |
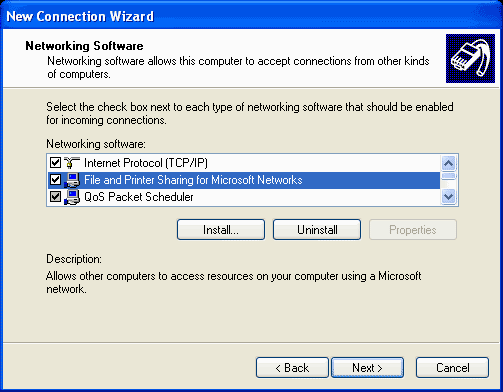
| Configuring XP to accept incoming connections |
| Figure D |
| |
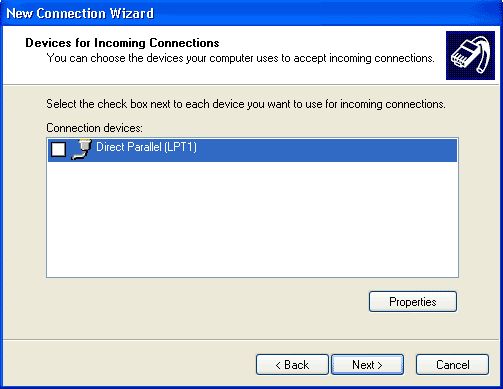
| Note that you are not presented with any of the network interfaces on the computer. |
| Figure E |
| |
| Figure F |
| |
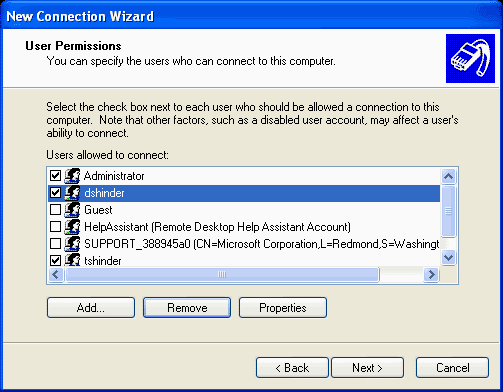
| Any user that isn’t selected won’t be able to initiate an incoming connection. |
| Figure G |
| |
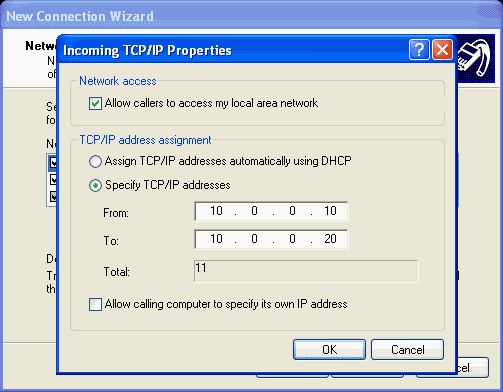
| Configuring TCP/IP properties |
| Figure H |
| |
| Granting LAN access to callers |
After the Incoming Connection is complete, right-click on the connection in
the Network Connections window and select the Properties command (see Figure
I).
| Figure I |
| |
| Accessing the properties of the VPN server link |
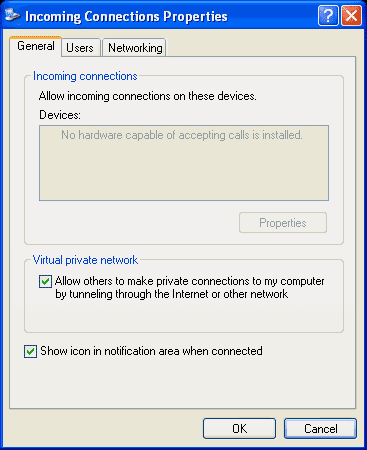
Note that on the General tab of the Incoming Connections Properties page (see
Figure J) that no devices are listed. The comment No Hardware Capable
Of Accepting Calls Is Installed isn’t true, since you can now create VPN
connections to both network interface cards. In practice, there is no
point in creating a VPN connection to the internal interface card.
| Figure J |
| |
| VPN clients will only call the external IP address of the Windows XP Professional VPN server. |
VPN server optimization tips
The New Connection Wizard made it easy to create the VPN server interface, but
you can still do more to optimize your VPN connections. First, note that you
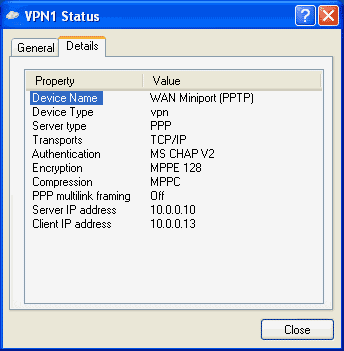
can create PPTP or L2TP/IPSec VPN connections. Figure K shows the connection
status dialog box of a Windows XP VPN client connected to a Windows XP VPN server.
Note that MPPE 128-bit encryption is automatically enabled and that Microsoft
CHAP v2 is used for authentication.
| Figure K |
| |
| If both machines had machine certificates from the same Certification Authority installed, an L2TP/IPSec VPN link could have been negotiated. |
If you want the VPN client to access resources on the internal network, the
IP address assigned to the VPN client should be on the same network ID as the
internal interface of the Windows XP VPN server computer. In addition, all the
machines on the internal network should have a default gateway set using the
IP address of the internal interface of the Windows XP VPN server.
In the unlikely event that the SOHO has multiple network segments, the routing
table on the Windows XP VPN server needs to be configured with paths to the
various internal network IDs. You can use the ROUTE ADD command to create these
routing table entries.
Small networks that use a Windows XP Professional machine for a VPN server probably
won’t have network services such as WINS or DNS. If name resolution on the private
network is an issue for the VPN client, then you should create a LMHOSTS file,
a simple text file that contains name and IP address mappings. For example,
the following line could represent an entry in an LMHOSTS file:
10.0.0.2 DEFIANT
Notepad tip
When you save the LMHOSTS file to the <system_root>\system32\drivers\etc
folder, make sure that the file doesn’t contain a file extension. To prevent
Notepad from appending a file extension to the filename, when you save the file
in Notepad, put quotes around LMHOSTS.
The VPN client must be configured with an IP address or host name for the Windows
XP Professional VPN server. If the Windows XP Professional client has a dedicated
link to the Internet and a static IP address, you can use that IP address in
the VPN client configuration interface. However, if the Windows XP Professional
VPN server is assigned an IP address via DHCP, you’ll have to use an Internet
host name and a method of registering the host name dynamically. A couple of
services you might want to look into are TZO
and DYNDNS. Both of these services will
let you dynamically register a computer’s IP address into the public DNS database.
Conclusion
Windows XP Professional provides simple VPN server capabilities that let you
connect single VPN clients to your internal network, one at a time. If the Windows
XP Professional computer has a dedicated connection to the Internet, you can
connect to that computer from virtually anywhere in the world using a VPN link.
The VPN server setup is simple and can accept calls from any Windows PPTP or
L2TP/IPSec client.